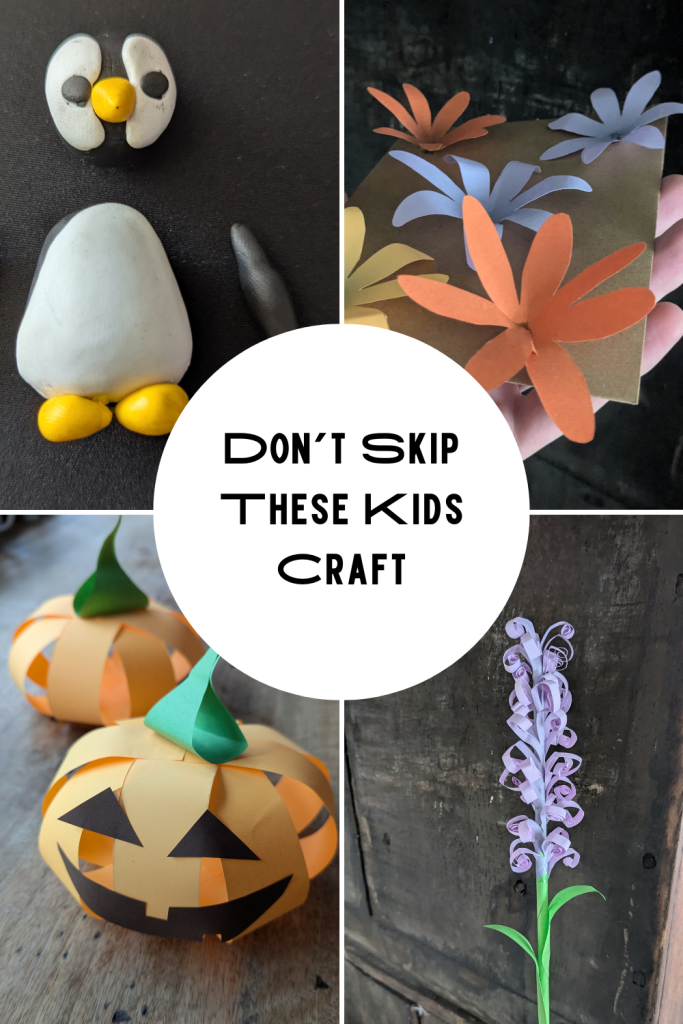
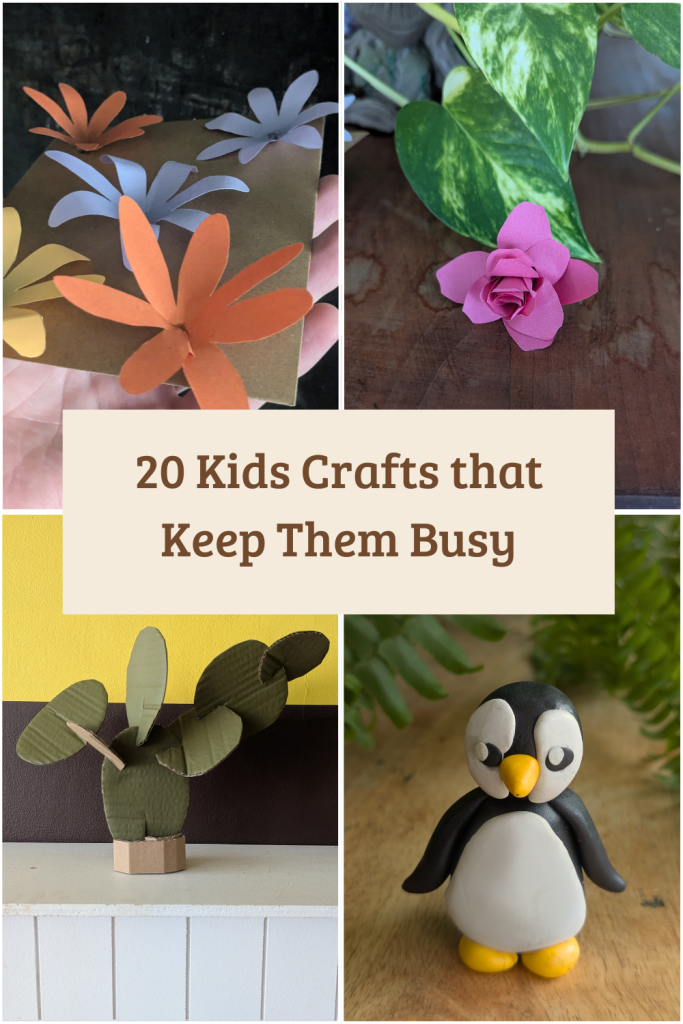
We’ve all had that moment. It’s a rainy afternoon, the kids are bored, and someone starts the dreaded “there’s nothing to DO” spiral.
These 20 DIY ideas for kids are your answer to that.
I’ve put together a mix of projects that use basic supplies you probably already have at home (cardboard, paper, paint, clay, pipe cleaners, egg cartons). No fancy tools. No craft store run. Just simple, hands-on fun that keeps little ones busy for a long, long time.
Some of these take five minutes. Some will keep them going for an entire afternoon. All of them are easy enough for beginners, and most work for a wide age range, from toddlers with a little help, all the way up to older kids who want to do it themselves.
Let’s get into it.
1. DIY Treasure Stones
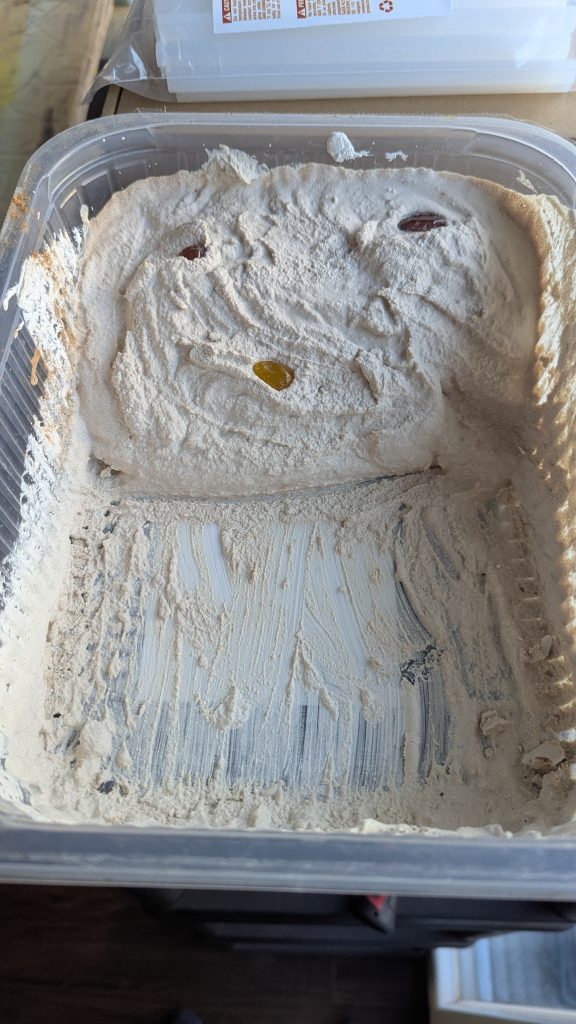
This one is easily the most exciting project on this list. Kids absolutely go wild for it.
You make the stones ahead of time, then hand them to your kids and watch the magic happen.
What you need:

- Sand
- Plaster of Paris
- Water
- Small cheap gemstones, coins, or tiny toys
- A mixing bowl
- A “chisel” (an old butter knife) and a small rubber mallet or wooden spoon
How to make it:
Mix one part plaster of Paris with one and a half parts sand and one part water.
Drop in a few gemstones. I also dropped in some plastic containers with toys inside.
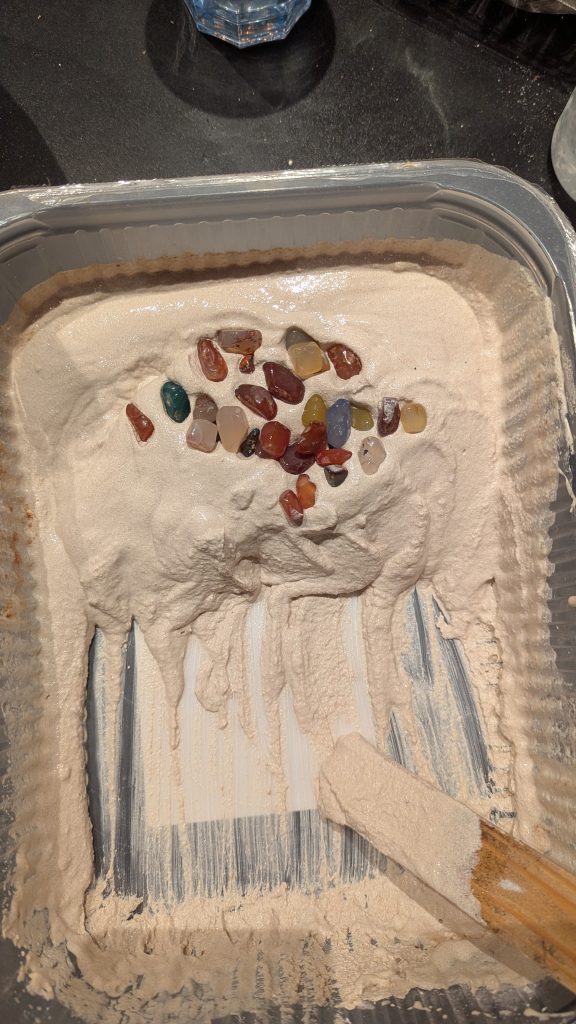
Cover with more of the mixture.
Let it set overnight.
The next day, hand the stone to your kids along with the chisel and mallet and tell them there’s hidden treasure inside.
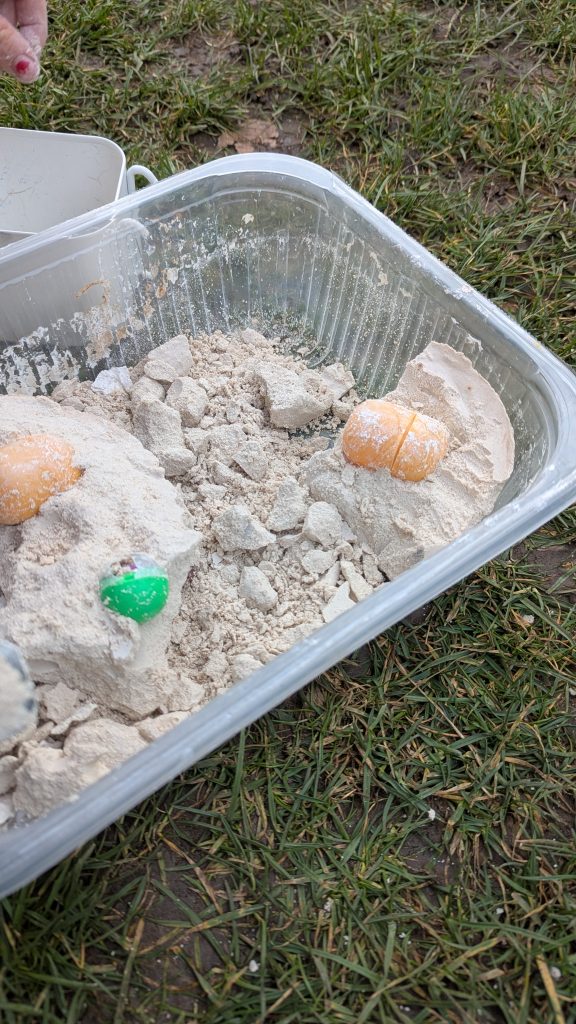
They will chip, tap, and dig until every single gem is found. It usually takes a good 30–45 minutes per stone, and they will ask you to make more immediately.
Tip: Make a few stones at once so you always have one ready to go. The dry stones keep indefinitely.
2. Paper Flower Crafts
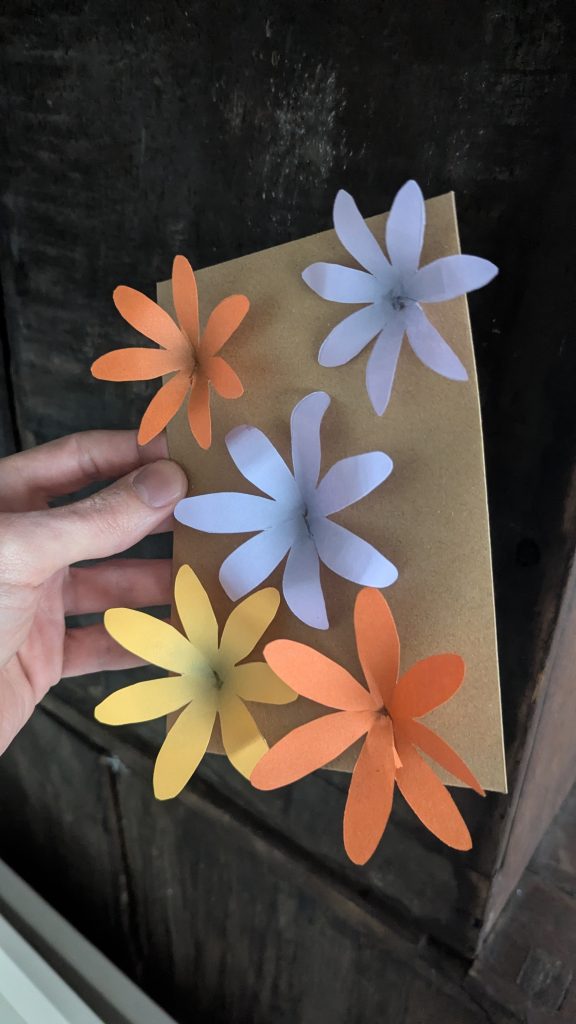
Paper flowers are one of those crafts that looks really impressive but is surprisingly easy once you have the right templates.
We have a full step-by-step guide for making three different paper flowers, a simple rose, a fun fuzzy flower, and a very basic flat flower that even young kids can cut and assemble. All three come with free printable templates so there’s no measuring or guessing involved.
What you need:
- Colored paper or tissue paper
- Scissors
- Glue or tape
- The free printable templates from our guide
- Optional: pipe cleaners or straws as stems
The templates do all the hard work. Your kids just print, cut, and put them together.
Get the full paper flower guide with free printable templates here
3. Cardboard Paper Animals
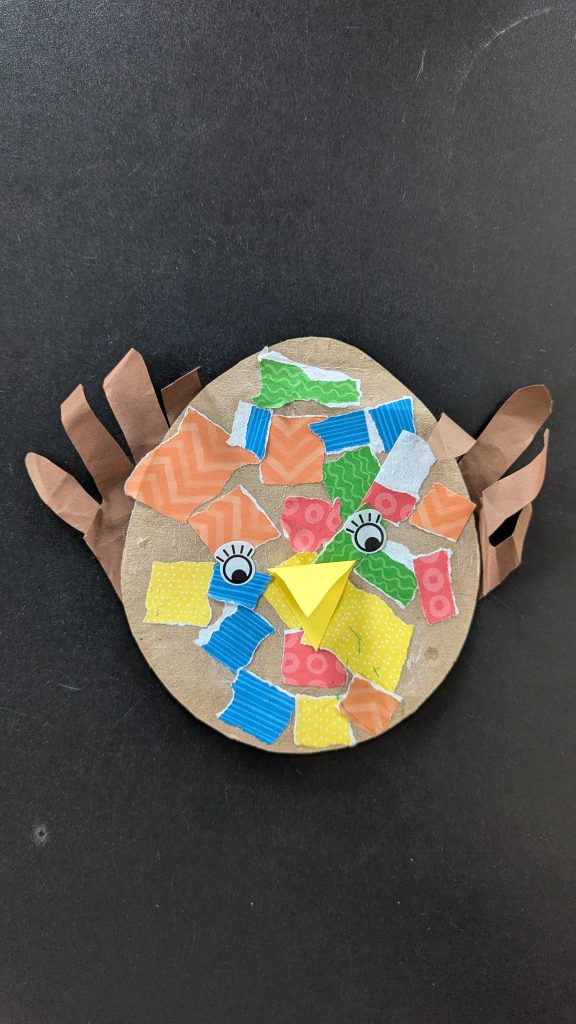
This one is perfect for little kids because there’s no “right” way to do it and that’s the whole point.
You cut the base shape. They build the animal.
What you need:
- One piece of cardboard (cut into a simple oval or circle. This is the body)
- Colored paper or construction paper
- Scissors
- Glue stick
How to make it:
Cut out a simple animal parts kit from colored paper ahead of time. Think: a beak, two small circles for eyes, a black dot for each pupil, tiny triangles for ears, strips of paper for fur or feathers, a tail, small oval shapes for paws.
Hand the kit to your kids with the cardboard oval and a glue stick. Tell them to make an animal.
That’s it. You’ll be surprised what they come up with. Some kids make owls. Some make cats. Some make something completely unidentifiable and are very proud of it. All of them are perfect.
Tip: Pre-cutting the parts is the secret to making this work for younger kids. Once the pieces are ready, even a three-year-old can do the whole thing independently.
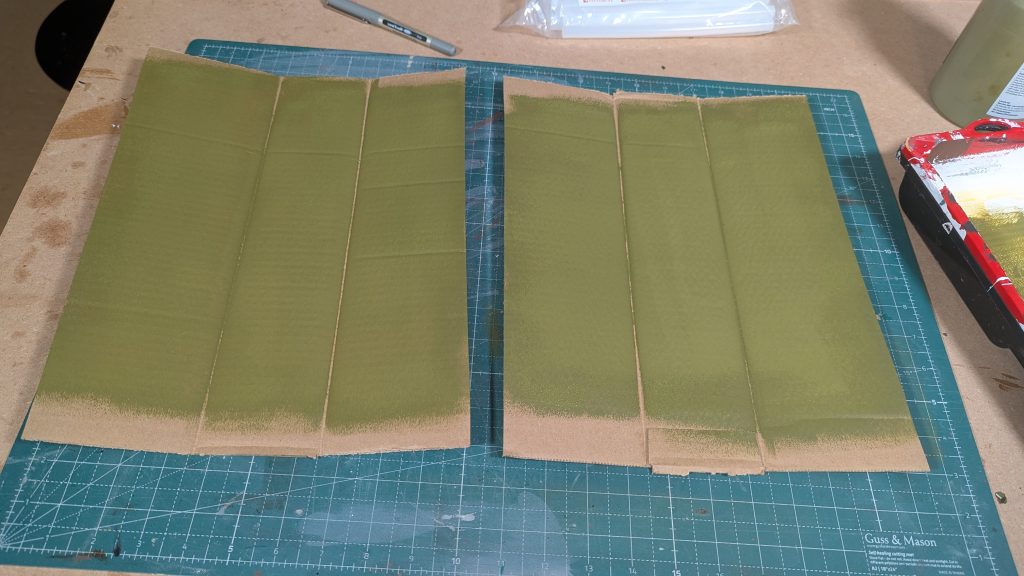
4. Cardboard Paper Cactus
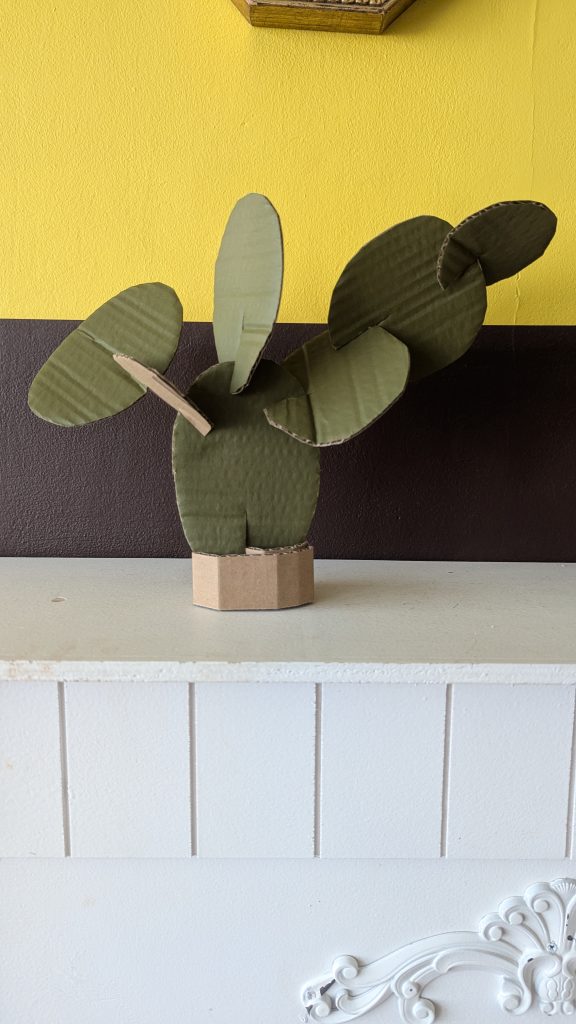
This little cardboard cactus looks so good when it’s done. It sits on a little paper cup and you can line a few of them up on a shelf or windowsill. Kids love making these.
What you need:
- Cardboard (cereal box cardboard works perfectly)
- A small paper cup
- Green acrylic paint
- A paintbrush
- Scissors
- White acrylic paint or washi tape (optional, for decoration)
- Glue
How to make it:
Paint the cardboard green on both sides. Let it dry. Cut out three or four rounded cactus-arm shapes. They look like chunky oval or kidney shapes, roughly the same size.
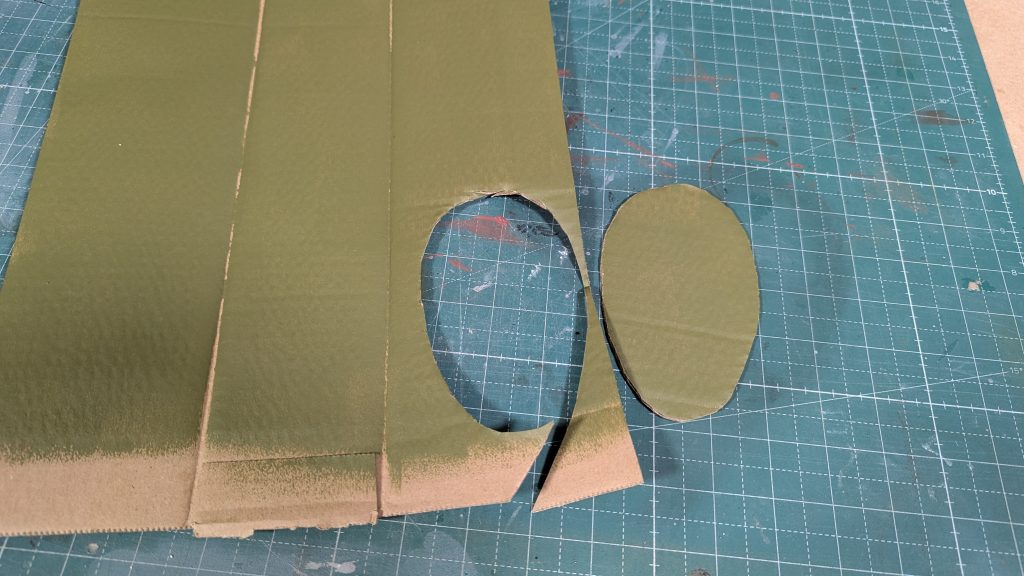
If you want, add white dot patterns with the back of a pencil dipped in paint, or stick on a small strip of washi tape for a fun pattern.
Now cut a slit halfway down through the middle of each shape. Slide the shapes into each other through the slits so they stand up and overlap, forming a 3D cactus.
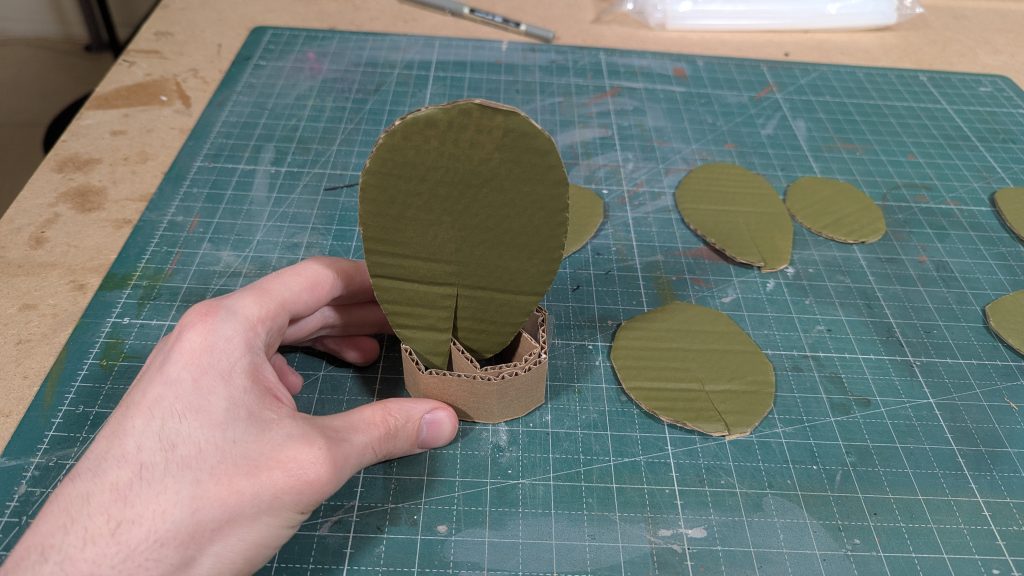
Done. It looks like something from a fancy plant shop.
5. Air Dry Clay Pinch Pots
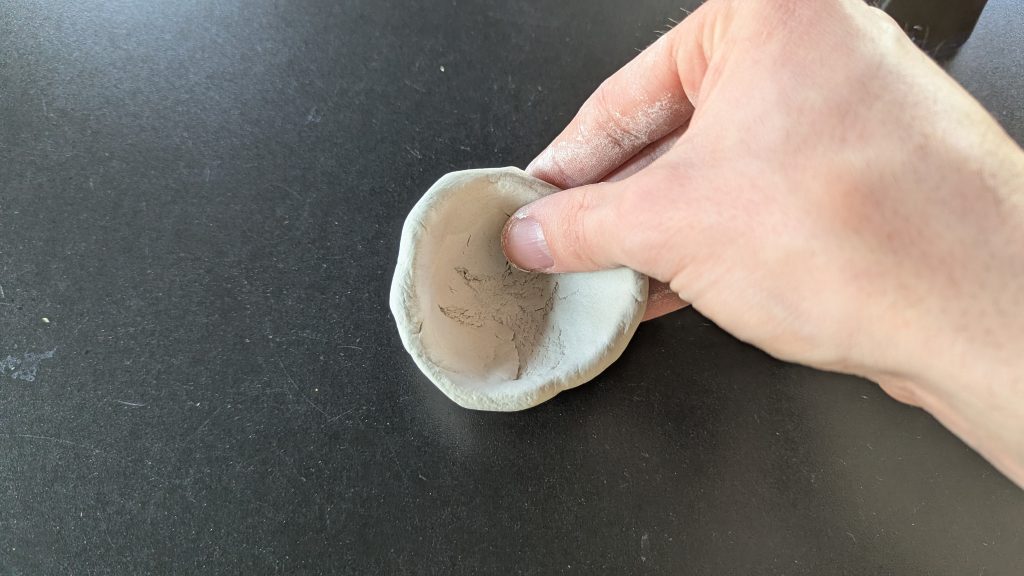
Air dry clay pinch pots are one of the best kids crafts you can do at home. They teach a real skill, they’re calming to make, and the finished result is something kids actually want to keep.
You only need air dry clay. That’s it.
Roll a ball of clay in your hands. Press your thumb into the middle. Slowly pinch and turn the clay, pressing outward until you have a little bowl shape. Smooth the edges. Let it dry. Then paint it if you want.
The whole process takes about 20 minutes, and kids can personalize their pot with paint, nail polish, or even some washi tape once it’s dry.
Full step-by-step guide with photos here
6. Air Dry Clay Animals

Air dry clay animals are one of the most fun kid projects you can do with clay. Kids can pick their favorite animal and build it step by step. No kiln and no experience needed.
We have a full guide with 10 easy animals including frogs, turtles, snails, bears, and more. Every animal is broken into small, simple steps that any kid can follow.
Full air dry clay animals guide here
7. Pipe Cleaner Flowers
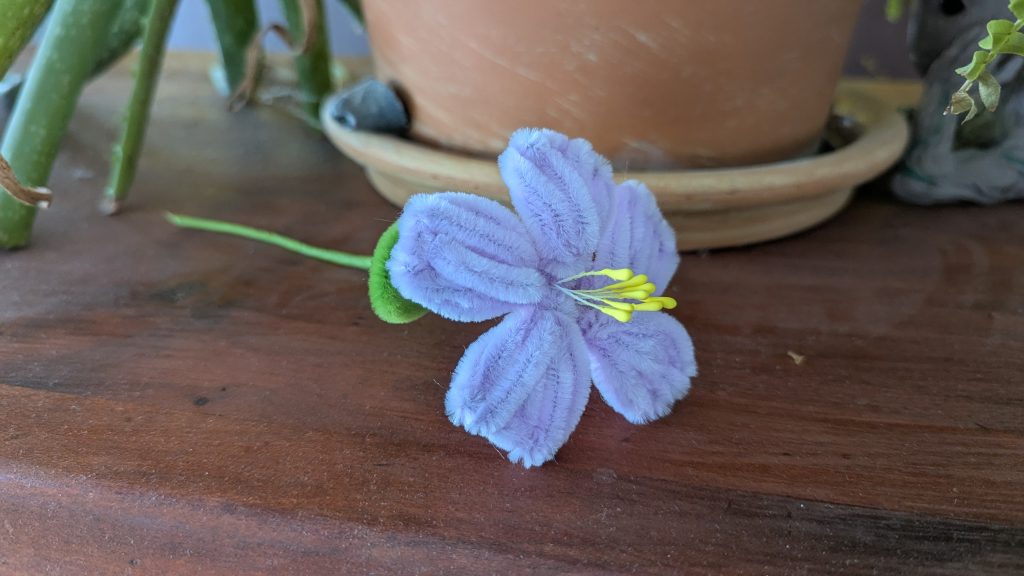
Pipe cleaner flowers are honestly one of the easiest crafts you can do with kids, and they look so pretty when they’re done. You can make a rose, a daisy, a sunflower, all just by bending and twisting pipe cleaners into shape.
We have a full tutorial that covers three different flower styles, with step-by-step instructions and photos for each one.
Full pipe cleaner flower tutorial here
8. Iron Bead Crafts (Perler Beads)
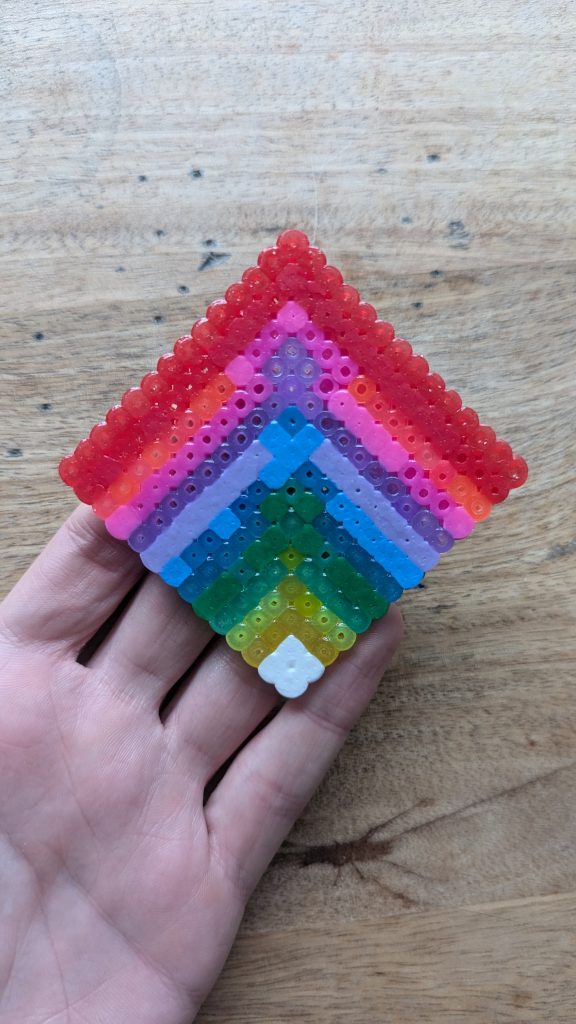
If your kids haven’t tried iron bead crafts yet, this is going to become their new obsession.
You get a peg board, a bag of tiny plastic beads, and you place the beads onto the board one by one to make a pixel-style picture. Animals, hearts, Minecraft characters, flowers, smiley faces, whatever you want.
Once the design is done, you cover it with the special ironing paper and an adult runs a warm iron over it for a few seconds. The beads melt just enough to fuse together. Peel it off the board and you have a solid little piece of art.
Kids can spend hours on this. Older kids especially love it. The starter kits are cheap and the beads last forever.
9. Pipe Cleaner Animals
Same idea as the pipe cleaner flowers but this time you’re making animals.
Twist a few pipe cleaners together to form the basic body. Bend some smaller pieces into legs, ears, tails, or antennae. Add googly eyes with a dab of glue.
A little spider needs only four pipe cleaners bent in half. A caterpillar is just a green pipe cleaner twisted into bumpy loops. A butterfly is two pipe cleaners twisted together in the middle and spread into wings.
These are great fun things for kids to make because they can invent their own animals and there’s truly no wrong way to do it.
10. Paper Cup Clowns
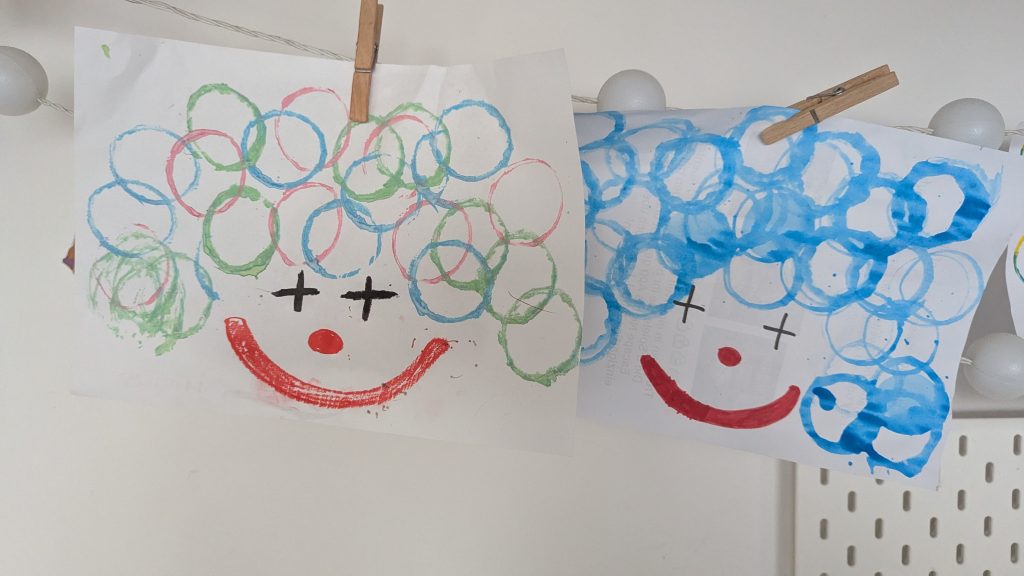
These little clowns are so funny and they’re really simple to make.
What you need:
- A paper cup
- White paper
- Acrylic paint in bright colors
- Paintbrushes
How to make it:
Paint two Xes on a piece of paper and a red dot for the nose. Then paint a big red smile under the nose to make the clown face. Let it dry for a few minutes.
Then give your kids the paper cups and pour some acrylic paints on a plastic tray. Now your kids can dip the cups in the paint and paint the hair of the clown.
Its a very simple but also kind of messy craft. So make sure to cover everything that should not get paint on it first!
11. Cupcake Liner Flowers
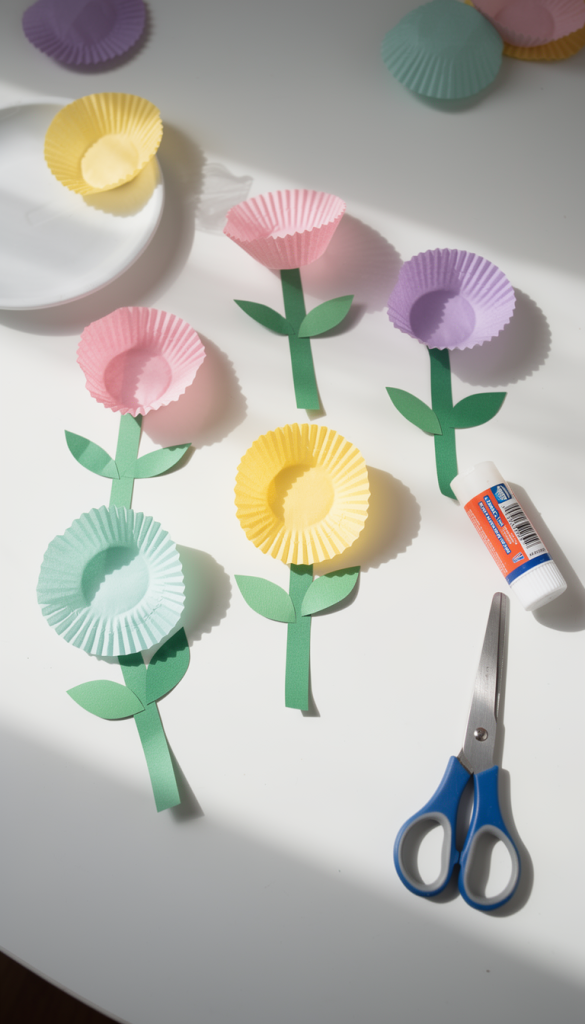
Grab a bag of cupcake liners and some colored paper and you’ve already got everything you need for this one.
Cut a strip from some green paper to make the stem of the flower and add some oval shapes to the stem for the leaf.
Then glue them together and glue a colored cupcake liner to the top. Finished is the cupcake linen flower!
12. Origami Boats
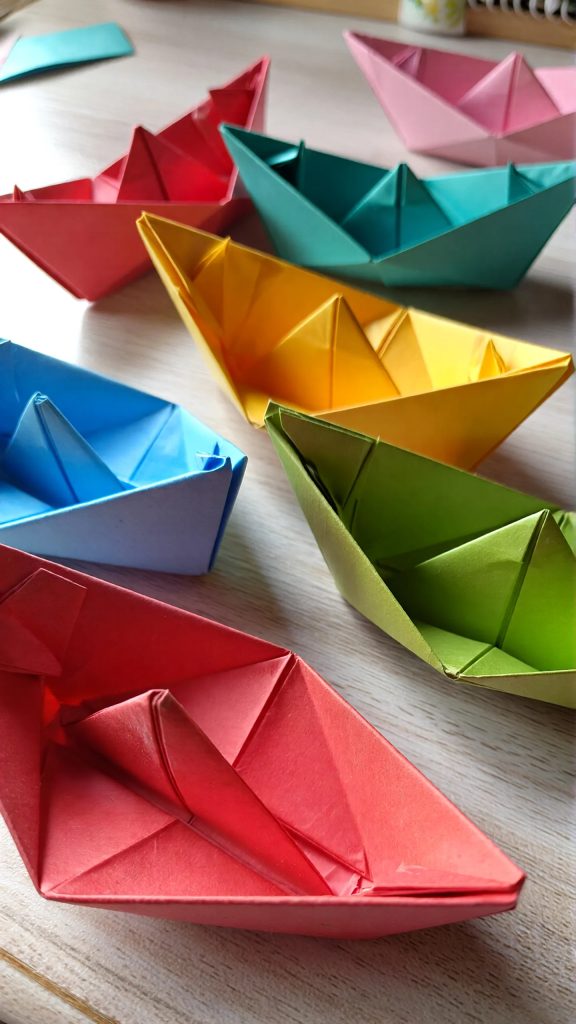
Origami boats are one of those simple kids arts and crafts ideas that never go out of style. All you need is a piece of paper.
Here is a video of me showing you hot to make one step-by-step:
Put them in a bowl of water and race them. Kids can decorate them with markers first, or make a tiny flag from a toothpick and a scrap of paper.
13. Painted Stones
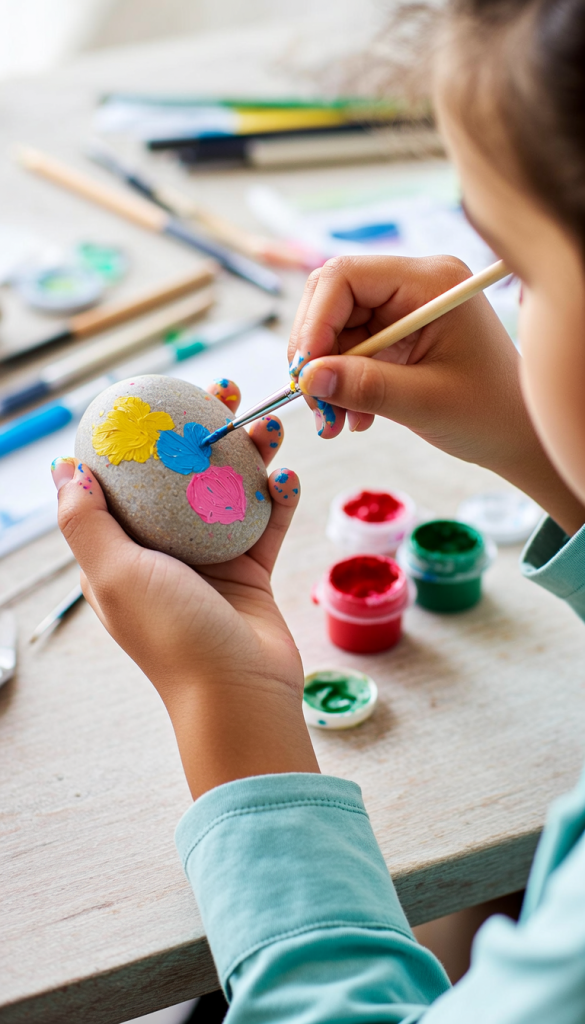
All you need is a handful of smooth stones and some acrylic paint.
Go outside and collect the stones together first, that part is half the fun. Then sit down at the table with a few colors of paint and let your kids go wild.
Some kids paint faces. Some paint animals. Some do rainbow stripes. Some press their finger into paint and make fingerprint art. Some just mix colors to see what happens.
Painted stones look lovely on a windowsill, in a plant pot, or as garden decorations. Seal them with a coat of Mod Podge so the paint lasts longer.
This is one of those calming crafts that keeps kids engaged for a long time without needing any instructions. Just hand them the paint and let them go.
14. Nature Crafts
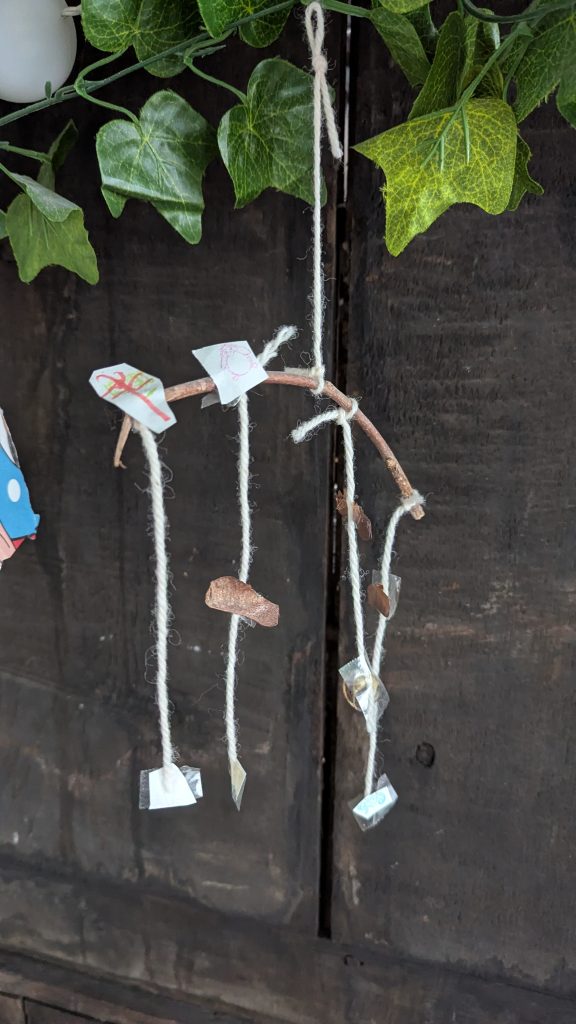
This one is as much an adventure as it is a craft.
Send the kids outside with a small bag, some tape, and a piece of string. Tell them their job is to collect anything interesting — sticks, leaves, seed pods, pebbles, feathers, bark, pine cones, whatever they find.
Then come back inside and turn it all into something.
The most popular thing to make is a nature mobile. Hang a long stick horizontally from two pieces of string tied to a clothes hanger or door frame. Then use more string to hang all the collected treasures from the stick at different lengths. A leaf here, a little pebble there, a couple of sticks tied into a star shape.
They can also make a nature picture by arranging everything on a piece of paper and gluing it down. Or press the leaves between two sheets of wax paper with a warm iron to make pressed leaf art.
The rule is simple: what they collect is the craft material. That gives kids real ownership over the whole project.
15. Simple Paper Pumpkin Lanterns

These little paper lanterns look lovely with a small LED tea light glowing inside, and they’re easy enough that even young kids can do most of the steps.
What you need:
- A sheet of colored paper or cardstock
- Scissors
- Tape or glue
- An LED tea light (important — not a real candle)
How to make it:
Here is the full guide that shows you step-by-step how to make one.
16. DIY Bracelets
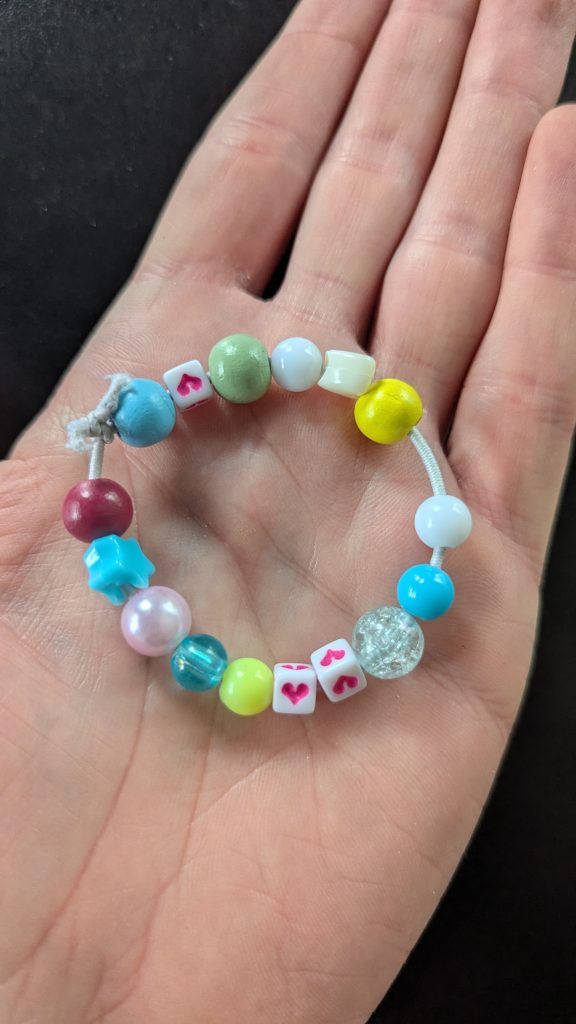
There are so many ways to make a bracelet, and kids genuinely love wearing something they made themselves.
The simplest version: pick three colors of embroidery thread, tape one end to the table, and braid them together. Tie both ends and you have a friendship bracelet.
A step up from that: thread beads onto an elastic cord or pipe cleaner. Wooden beads painted with nail polish. Letter beads to spell a name. A mix of everything. Tie the ends together.
Older kids can try simple macramé knot bracelets. Younger kids do great with just threading beads onto a pipe cleaner bent into a circle.
The result is always something they’re proud to wear or give as a gift.
17. Egg Carton Mushrooms on a Stick
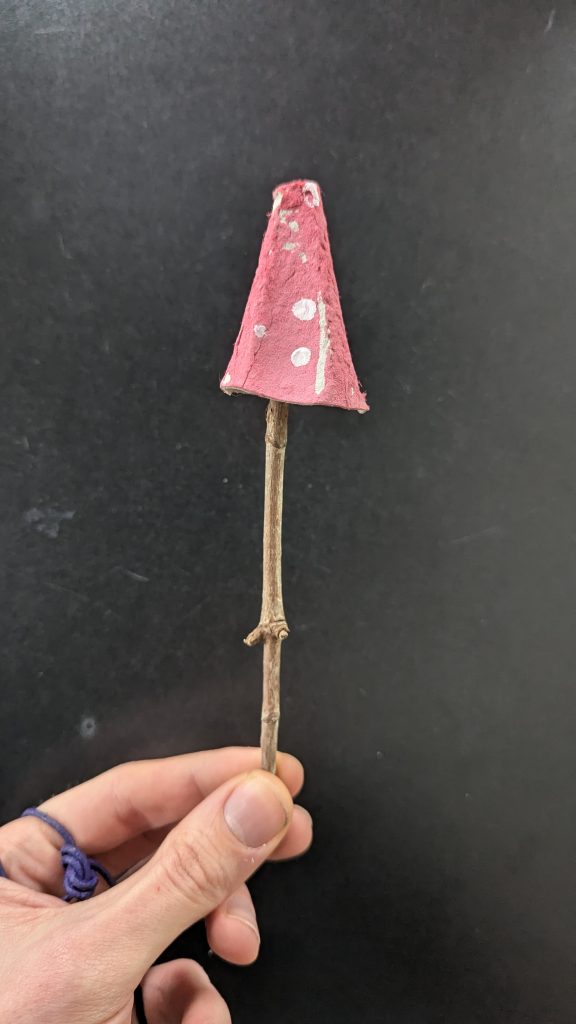
These are so charming and they’re made entirely from recycled materials.
What you need:
- An egg carton
- Acrylic paint
- A paintbrush
- Sticks collected from outside
- Glue (hot glue is fastest, but regular craft glue works)
- White acrylic paint for the spots
How to make it:
Cut the individual egg cups out of the carton. Each cup becomes one mushroom cap. Paint them in whatever color you like, red and orange are classic, but purple and blue mushrooms are just as fun.
Once dry, add white spots with the back of a pencil dipped in white paint.
Let the caps dry completely. Then poke a stick into the bottom of each cup from underneath, or glue it inside the cup. You now have a little toadstool on a stick.
Make a few and plant them in a pot of dirt or line them up along a windowsill for the cutest little mushroom garden.
18. Paper Bag Puppets
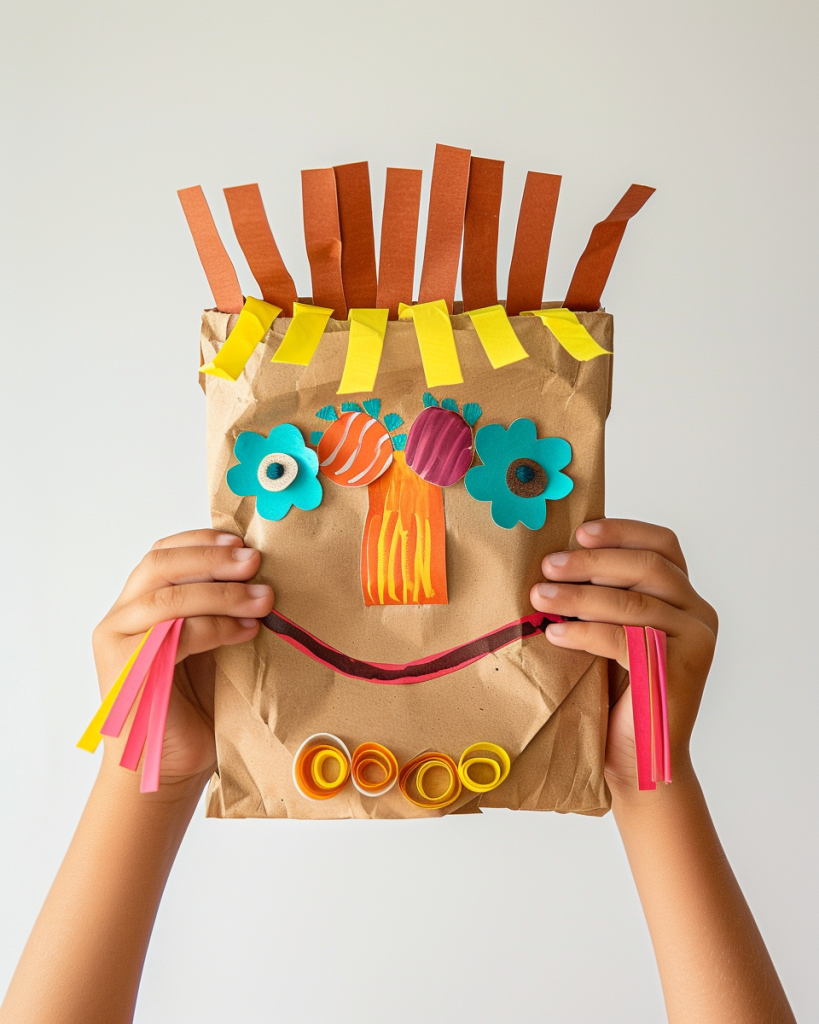
Flat-bottomed paper bags make the best puppets. The fold at the bottom of the bag becomes the mouth — when you put your hand in the bag and open and close your fingers, the puppet talks.
What you need:
- A small flat-bottomed paper bag
- Colored paper
- Markers
- Googly eyes (optional)
- Glue and scissors
Draw a face across the bottom fold. Add the eyes on the flap and the lower lip below the fold. Cut out ears, hair, horns, wings, or whatever character you’re making from colored paper and glue them on.
Stick your hand in and put on a show.
Kids can make a whole cast of characters and then act out a play together. A surprisingly long activity for something that only takes a few minutes to make.
19. Marble Painting
Marble painting is one of those simple kids arts and crafts ideas that always produces something beautiful and kids never get bored of it.
What you need:
- A shoebox or tray with sides
- Paper cut to fit inside
- A few marbles
- Acrylic paint or washable tempera paint in a few colors
How to make it:
Put the paper in the tray. Drop small blobs of different paint colors directly onto the paper. Drop in two or three marbles. Pick up the box and tilt it from side to side so the marbles roll through the paint.
The marbles leave swirling lines of color across the paper. No two pictures look the same.
Let it dry flat and you have a piece of art that genuinely looks impressive. It works great as wrapping paper for handmade gifts too.
20. Salt Dough Handprints
This is a classic for a reason. Salt dough handprints are simple to make, they last forever, and they’re genuinely meaningful. Grandparents lose their minds over these.
What you need:
- 2 cups flour
- 1 cup salt
- About ¾ cup water
How to make it:
Mix the flour and salt together. Add water a little at a time and knead until you have a smooth, firm dough. Roll it out to about half an inch thick.
Press your child’s hand firmly into the dough to leave a clear print. Cut around the shape if you want, or leave it as a circle or square tile. Use a straw to poke a hole at the top if you want to hang it later.
Bake at 200°F (95°C) for about 2–3 hours until completely hard and dry, or leave it out to air dry for a couple of days.
Once it’s cool, kids can paint it, write the year on the back, and seal it with a coat of varnish or Mod Podge.
These look wonderful hung on a wall, and a few years from now you’ll be so glad you made them.
Ready to Get Making?
You don’t need a perfectly stocked craft room to have a great afternoon with your kids. Most of these projects use things you already have. Cardboard boxes, paper bags, paper cups, paint, clay, pipe cleaners.
The best crafts are the ones where kids feel like they made something real. Something they can hold, play with, wear, or give as a gift.
Happy making!